
Testing and Deployment Overview
Before setting up the needed environments, it’s good to define the high level targets.

The general idea in this setup is to make the deployments and testing automated where feasible, yet keep the system simple enough to implement and maintain. The target is to set up the system in such a way that acceptance testing and production environment updates are triggered manually even if the deployments are automated.
Development Environment
The local development environment is where the development is done. Created pull-requests, merges and other actions trigger jobs for the CI system.
Version Control System
The version control system keeps track of the source code and other content changes and triggers CI jobs based on configured rules.
Continuous Integration
Component specific unit and API tests are run by the continuous integration service. The CI will also build and push container images into a container registry, if the tests are passed, and deploy new components to the testing environment. The target is to also trigger the automated acceptance tests to see if the changes affect the system as a whole.
Container Registry
The container registry stores and shares the container images built by the CI service.
Testing Environment
The testing environment is the first environment where the whole system runs in a similar manner as in production. The environment is meant for various testing activities and the system state isn’t automatically reset when the components are updated.
Acceptance Testing Continuous Integration
This environment is meant for running automated acceptance tests. The system starts from the initial state for every test round.
Acceptance Testing Environment
The environment for performing additional manual acceptance tests before the service is accepted for the production deployment.
Production Environment
The environment where the service is available for the end users.
The target for the development and deployment architecture is set for now. Later in the acceptance test related articles we’ll see how close to the target we actually get ;).
Testing Environment Setup
In the following chapters we’ll take a few new web services into use. Now it’s a good time to create accounts for Kontena, UpCloud, Docker Hub, GitLab and Shippable before continuing forward.
UpCloud and Kontena Setup
The setup will be based on Kontena Container and Microservices Platform and hosted in UpCloud IAAS cloud platform.
So let’s install the Kontena CLI application. For macOS the installation procedure is very straightforward: we’ll download the latest stable Kontena CLI release, open the downloaded .pkg file, and follow the installer guidelines to complete the installation.
After the installer program completes, we check the installed Kontena version and log in into Kontena cloud:
|
1 2 3 |
$ kontena version $ kontena cloud login |
It’s possible to use already existing ssh-keys, but here we create a new pair of keys to be used with the UpCloud servers and set the key file name to id_rsa_upcloud:
|
1 2 3 4 5 6 |
$ ssh-keygen -t rsa Generating public/private rsa key pair. Enter file in which to save the key (/Users/<username>/.ssh/id_rsa): /Users/<username>/.ssh/id_rsa_upcloud Enter passphrase (empty for no passphrase): Enter same passphrase again: |
These two commands do quite a lot for us; we’ll end up having two CoreOS-based servers in the UpCloud: one server is the master and the other one is the node. The master is used for controlling the node(s) and all of our application containers will run in the node server.
With the used parameters we’ll create the servers into Frankfurt with the default pre-configured option (1xcpu, 1 GB ram & 30 GB, at the time of writing), but these parameters can be modified.
Let’s venture forth by creating the master server:
|
1 2 |
$ kontena upcloud master create --username <upcloud_username> --password <upcloud_password> --ssh-key ~/.ssh/id_rsa_upcloud.pub --zone de-fra1 |
And then the node server:
|
1 2 |
$ kontena upcloud node create --username <upcloud_username> --password <upcloud_password> --ssh-key ~/.ssh/id_rsa_upcloud.pub --zone de-fra1 |
Initially Kontena CLI will keep reminding us about server using a certificate signed by an unknown authority. It’s possible to set SSL_IGNORE_ERRORS=true environment variable, set a proper certificate for the Kontena master, or copy the default self-signed server certificate into ~/.kontena/certs/<master_ip_address.pem file from the master server. We’ll go with the last option:
|
1 2 |
$ scp -i ~/.ssh/id_rsa_upcloud root@<master_ip_address>:/etc/kontena-server.pem ~/.kontena/certs/<master_ip_address>.pem |
Just to be sure Kontena CLI is working now properly, let’s give it a go:
|
1 2 3 4 5 |
$ kontena grid list Name Nodes Services Users test * 0 0 2 $ |
After the servers have been created, we can access them via ssh as a root user if needed:
|
1 2 |
$ ssh root@<server_ip_address> -i ~/.ssh/id_rsa_upcloud |
Docker Image Registry Config
Docker Hub is used for hosting the created docker images in these articles. For these articles we created articleprojects organisation and front-service, app-service and auth-service repositories under it.
Once the setup is done, let’s log in to docker:
|
1 2 |
$ docker login |
Dockerfiles
The Dockerfiles we defined in previous article won’t work outside of the local development environment. We need to define new files for the production environment.
Dockerfile.prod for the Front Service:
|
1 2 3 4 5 6 7 8 9 10 11 12 13 14 15 16 17 18 19 20 21 22 23 24 25 26 27 28 29 30 31 32 33 34 35 36 37 |
FROM node:8.11.2-alpine # Create app directory RUN mkdir /src # Install app dependencies ADD package.json npm-shrinkwrap.json /src/ # Update npm to a spesific version RUN npm install npm@5.6.0 -g # Change the ownership of the copied files and change to node user RUN chown -R node:node /src USER node # Install production dependencies RUN cd /src && npm install --only=production --no-optional --loglevel warn && npm cache clean --force # Copy all the files into the container to make the container independent from local files USER root COPY . /src # Remove test files before the build operation: https://github.com/zeit/next.js/issues/988 RUN find /src -type f -name "*.test.js" -exec rm -f {} \; RUN cd /src && npm run build RUN chown -R node:node /src/.next/* USER node WORKDIR /src # Define an open port for the container EXPOSE 3300 # Defined in package.json CMD [ "npm", "start" ] |
Compared to the development version, the major differences are:
- Source files are copied into the container
- Only production module dependencies are installed
- Containers are run by the node user instead of the root
The Dockerfile.prod files for App and Auth Services are almost identical and available in GitLab:
- https://gitlab.com/article-projects/app-service/blob/master/Dockerfile.prod
- https://gitlab.com/article-projects/auth-service/blob/master/Dockerfile.prod
Smoke Test Deployment
We’ll do a smoke test run to make sure the basic scripts are working and we’re able to run our containers in the testing environment.
Let’s begin by defining the smoke test deployment descriptor for Kontena:
|
1 2 3 4 5 6 7 8 9 10 11 12 13 14 15 16 17 18 19 20 21 22 23 24 25 26 27 28 29 30 31 32 33 34 35 36 37 38 39 40 41 42 43 44 45 46 47 48 49 50 51 52 53 54 55 56 57 58 59 60 61 62 63 64 65 66 67 68 69 70 71 72 73 74 75 76 77 78 79 80 81 82 83 84 85 86 87 88 89 90 91 92 93 94 95 96 97 98 99 100 101 102 103 104 105 106 107 108 109 110 111 112 |
stack: coodari/article-project version: 1.0.0 description: Article project testing environment smoke stack variables: front_service_version: type: string from: vault: FRONT_SERVICE_VERSION app_service_version: type: string from: vault: APP_SERVICE_VERSION auth_service_version: type: string from: vault: AUTH_SERVICE_VERSION services: load-balancer-proxy: image: kontena/lb:latest ports: - 80:80 front-service: image: "articleprojects/front-service:${front_service_version}" environment: - KONTENA_LB_MODE=http - KONTENA_LB_BALANCE=roundrobin - KONTENA_LB_INTERNAL_PORT=3300 links: - load-balancer-proxy depends_on: - app-service - auth-service secrets: - secret: FRONT_SERVICE_DOMAIN name: KONTENA_LB_VIRTUAL_HOSTS type: env app-service: image: "articleprojects/app-service:${app_service_version}" environment: - NODE_ENV=production - KONTENA_LB_MODE=http - KONTENA_LB_BALANCE=roundrobin - KONTENA_LB_INTERNAL_PORT=3000 links: - load-balancer-proxy depends_on: - db-app secrets: - secret: APP_SERVICE_DOMAIN name: KONTENA_LB_VIRTUAL_HOSTS type: env auth-service: image: "articleprojects/auth-service:${auth_service_version}" environment: - NODE_ENV=production - KONTENA_LB_MODE=http - KONTENA_LB_BALANCE=roundrobin - KONTENA_LB_INTERNAL_PORT=3100 links: - load-balancer-proxy depends_on: - db-auth secrets: - secret: AUTH_SERVICE_DOMAIN name: KONTENA_LB_VIRTUAL_HOSTS type: env db-app: image: postgres:9.6.2 stateful: true volumes: - db_volume_app:/var/lib/postgresql/data secrets: - secret: APP_POSTGRES_USER name: POSTGRES_USER type: env - secret: APP_POSTGRES_PASSWORD name: POSTGRES_PASSWORD type: env - secret: APP_POSTGRES_DB name: POSTGRES_DB type: env db-auth: image: postgres:9.6.2 stateful: true volumes: - db_valume_auth:/var/lib/postgresql/data secrets: - secret: AUTH_POSTGRES_USER name: POSTGRES_USER type: env - secret: AUTH_POSTGRES_PASSWORD name: POSTGRES_PASSWORD type: env - secret: AUTH_POSTGRES_DB name: POSTGRES_DB type: env volumes: db_volume_app: external: name: db-volume-app db_valume_auth: external: name: db-volume-auth |
With the file above we defined the following things:
- Service stack including the used services
- Environment variables from the Kontena Vault
- To connect services to the Kontena load balancer we need to pass some values via environment variables and link the services with the load balancer service
- Volumes for the database services: volumes aren’t necessarily needed in the testing environment, but to keep the environments consistent we’ll use them also here
Speaking of the volumes, we need to define them before the stack can be installed:
|
1 2 3 |
$ kontena volume create --scope grid --driver local db-volume-app $ kontena volume create --scope grid --driver local db-volume-auth |
In the testing, acceptance testing and production environments we’re going to refer to the images using their tagged version numbers instead of using tags like latest. So let’s build the components and tag them with version 1:
|
1 2 3 |
front-service$ docker build -f Dockerfile.prod -t articleprojects/front-service:1 . front-service$ docker push articleprojects/front-service:1 |
|
1 2 3 |
app-service$ docker build -f Dockerfile.prod -t articleprojects/app-service:1 . app-service$ docker push articleprojects/app-service:1 |
|
1 2 3 |
auth-service$ docker build -f Dockerfile.prod -t articleprojects/auth-service:1 . auth-service$ docker push articleprojects/auth-service:1 |
Let’s also write the used image version numbers and domain names into Kontena Vault to make them available for the deployment descriptor:
|
1 2 3 4 |
$ kontena vault write FRONT_SERVICE_VERSION 1 $ kontena vault write APP_SERVICE_VERSION 1 $ kontena vault write AUTH_SERVICE_VERSION 1 |
|
1 2 3 4 |
$ kontena vault write FRONT_SERVICE_DOMAIN example.com,www.example.com $ kontena vault write APP_SERVICE_DOMAIN app.example.com $ kontena vault write AUTH_SERVICE_DOMAIN auth.example.com |
We’ll use example.com here for presentation purposes, but any domain will do as long as you have access to its DNS records. We set A records for app.example.com, auth.example.com and example.com names to point to our node server ip address and a CNAME record to direct www.example.com to example.com. Depending on the set TTL and other factors it usually takes from a few minutes to a few hours for the changes to take effect.
We also need to set some configs for the PostgreSQL database services. Here we’ll use postgres as a username, database_prod as a database name and unique strong passwords for both services:
|
1 2 3 4 5 6 7 |
$ kontena vault write APP_POSTGRES_USER postgres $ kontena vault write APP_POSTGRES_PASSWORD <postgres_password> $ kontena vault write APP_POSTGRES_DB database_prod $ kontena vault write AUTH_POSTGRES_USER postgres $ kontena vault write AUTH_POSTGRES_PASSWORD <postgres_password> $ kontena vault write AUTH_POSTGRES_DB database_prod |
Now, let’s give it a try:
|
1 2 |
deployment-scripts$ kontena stack install kontena-testing-smoke.yml |
In case everything went fine, and the DNS changes are in place, all the services should be available via their respective domains. It’s good to make sure everything is working well at this point, before continuing to SSL/TSL certificate configuration.
SSL/TSL Certificates via Let’s Encrypt
Kontena provides built-in integration with Let’s Encrypt for easy certificate management. Let’s start by registering an email address. Let’s Encrypt will connect the given email to the domain and send reminders about expiring domain certificates to the address:
|
1 2 |
$ kontena certificate register <example@example.com> |
The domain authorisation is DNS-based so we need to tweak the DNS records once again. Since Let’s Encrypt doesn’t support wild card certificates we need to do the authorisation for all four domains (example.com, www.example.com, app.example.com and auth.example.com).
We’ll repeat the following authorisation part for each domain and add a TXT record using the name and content information the commands return.
|
1 2 |
$ kontena certificate authorize example.com |
After completing the above steps for all four domains we’ll request a single combined certificate:
|
1 2 |
$ kontena certificate get --secret-name SSL_LOAD_BALANCER_CERT example.com www.example.com app.example.com auth.example.com |
Kontena automatically creates the following vault keys with the cert-related content so we don’t need to handle the cert using any files:
- SSL_LOAD_BALANCER_CERT_PRIVATE_KEY
- SSL_LOAD_BALANCER_CERT_CERTIFICATE
- SSL_LOAD_BALANCER_CERT_BUNDLE
For our Kontena load balancer, the SSL_LOAD_BALANCER_CERT_BUNDLE is the vault key we need. To enable the SSL certificate we need to pass the bundle as a SSL_CERTS secret. To force the http -> https redirect we use KONTENA_LB_CUSTOM_SETTINGS env variable. We also enable 443 port for the load balancer. Here is the config at this point in GitHub:
So let’s give it a try:
|
1 2 |
deployment-scripts$ kontena stack upgrade article-project kontena-testing-smoke-cert.yml |
If things went as they should, our services are now properly equipped with https-connection features. We need to check that all three services are available via their https-addresses and we also need to make sure the http->https redirection works by trying out unsecured http-addresses. Good!
Let’s Encrypt certificates will expire in three months and at the moment Kontena won’t handle the update automatically. However I’ve understood that the people at Kontena are thinking about implementing the support for the http-based domain validation model, which would allow automatic certificate updates.
Anyways, the certificate update can be done by redoing the authorisation via DNS, and then running the kontena certificate get –secret-name… again to update the vault variables with new certificates. Once the certificates are updated the Kontena load balancer should take the updated certificates into use automatically.
Basic Auth
Since the testing environment is basically available for any internet user, we’re going to set a basic auth to give it some protection against unwanted visitors. Depending on the situation, better protection may be needed, but this is a good start.
In this example we set user1:pass1234 credentials for Front, App and Auth Services:
|
1 2 3 4 |
$ kontena vault write BASIC_AUTH_FRONT_SERVICE << EOF → user user1 insecure-password pass1234 → EOF |
|
1 2 3 4 |
$ kontena vault write BASIC_AUTH_APP_SERVICE << EOF → user user1 insecure-password pass1234 → EOF |
|
1 2 3 4 |
$ kontena vault write BASIC_AUTH_AUTH_SERVICE << EOF → user user1 insecure-password pass1234 → EOF |
We enable the basic auth feature by passing the credentials to the services as KONTENA_LB_BASIC_AUTH_SECRETS secret. Also encrypted passwords are supported, more information about those are available in the Kontena load balancer documentation.
Our Kontena configuration for testing environment is now ready – and available in GitLab – so let’s give it a shot and make sure the basic auth is working as expected:
|
1 2 |
$ kontena stack upgrade article-project kontena-testing.yml |
Continuous Integration Service Setup
Continuous Integration (CI) Overview
The Idea is to run component specific tests for every master branch change, for front and back end service code repositories. If the code passes the tests and other requirements, the system builds new images, pushes them into Docker Hub, and commands Kontena to update the testing environment service stack with the latest containers.
Depending on the component, CI tests will contain unit tests, API tests, test coverage checks and ESLint coding convention checks.
GitLab Integration
A GitLab access token is needed for granting the Shippable access to the GitLab repositories and to automatically trigger CI-builds when merges, commits and pull-requests happen. The access token can be created in User Settings -> Access Tokens menu in GitLab. With the access token it’s possible to enable the integration in Shippable via Account Settings -> Integrations.
After creating the integration, the synced projects and repositories have to be selected in Shippable. By clicking the Subscriptions hamburger menu in the top left corner the list of available Git repo groups/projects/repos becomes visible. After selecting a group from the list, related available repositories are shown in the screen. By clicking Enable for a repository, the integration between Shippable and GitLab is enabled for it. If expected Git-projects aren’t visible in the Subscriptions list, the Sync button in Account Settings may solve the issue.


Docker Hub Integration
Docker Hub credentials are needed for enabling the Shippable integration. Integration can be added via Account Settings -> Integrations and creating a new Docker integration. The integration must be also enabled for each repository group or specific repositories.


Shippable Configurations
Let’s start by creating a never-expiring token for accessing Kontena Master CLI, since we’ll need it in the following shippable.yml scripts:
|
1 2 |
$ kontena master token create --expires-in 0 --token |
Next we define the shippable.yml configuration for the Front Service:
|
1 2 3 4 5 6 7 8 9 10 11 12 13 14 15 16 17 18 19 20 21 22 23 24 25 26 27 28 29 30 31 32 33 34 35 36 37 38 39 40 41 42 43 44 45 |
# Language setting language: node_js # Version number node_js: - 8.11.2 branches: only: - master env: global: - NODE_ENV=continuous_integration # DOCKER_HUB_REPO - secure: JiHAr/PyfOjSKd49OAXV/ZpzBEimXBgYV0+s/L+qvqu4m8zY2OzaKfp4wuYVRGHM5bCETa6pl65Z1s6P/Ya1k8ALJ2F7AA29gIXxv/Z3YauPEHaiskRmkObqD9GWAvnNlgkWMZCn00l57YcmcQI52BB4RJuIkIH7srkDxT+x5SLxzM4p8PbkLewCtCZvhwIbtVJAzPbpCOlFb9TAU/vTfkOVM1MvsCJOeYqxpNzWMw2xp0gNWmEO6flP9sa2RlvT1EI2MqrU49HqS+VAcjAYHnU0QkbA8FDOMWVG7r46DWbSkBdbD9Jh/5QceYnwZTD1FlV4jnpljzmUM1stYbaPpw== build: ci: # Specific version is used to avoid issues due to version differencies - npm install npm@5.6.0 -g - npm -v - npm install - npm test on_success: - if [ "$IS_PULL_REQUEST" == "false" ] ; then docker build -f Dockerfile.prod -t $DOCKER_HUB_REPO:$BUILD_NUMBER . ; fi - if [ "$IS_PULL_REQUEST" == "false" ] ; then docker push $DOCKER_HUB_REPO:$BUILD_NUMBER ; fi - if [ "$IS_PULL_REQUEST" == "false" ]; then echo "versionName=$BUILD_NUMBER" >> $JOB_STATE/front-image-resource.env ; fi integrations: hub: - integrationName: DockerHubIntegration type: docker branches: only: - master notifications: - integrationName: email type: email on_success: never on_failure: never on_pull_request: never |
The configuration file defines following things:
- The CI environment is a Node.js environment with node version 6.10.2
- The script is run only for master branch related activities
- A few visible environment variables as well as secret environment variables are set
- Npm test runs the tests for the Front Service
- Ruby (for Kontena CLI) and Kontena CLI are installed
- In case the tests were successful and the CI run isn’t a pull-request related run, the container is built and pushed to Docker Hub, and the new container is deployed to the testing environment
- In the integrations section the integration with Docker Hub is defined so that Shippable knows to automatically use Docker Hub credentials.
- Notification e-mails are disabled
With the secret environment variables, it’s quite safe to store Shippable secrets in Git, since the encryption key is Shippable user or project group specific. It seems to be possible to use the same secrets with projects belonging to the same repository group, but not with projects belonging to another group. The secrets can be set via repository group Settings -> Encrypt menu.
For the App and Auth Services we’ll create very similar shippable.yml configurations:
- https://gitlab.com/article-projects/app-service/blob/master/shippable.yml
- https://gitlab.com/article-projects/auth-service/blob/master/shippable.yml
The only major difference compared to the Front Service is the added PostgreSQL service which is needed for the API tests.
Kontena also provides a HTTP API interface, but based on the discussion on the Kontena Community Slack channel the CLI is the recommended way to access the master from CI environments; in the end the API calls would only replicate the already existing CLI functionality in a more complicated way.
Everything should now be in place for trying out the Shippable builds, so let’s commit and push those shippable.yms files into GIT-repositories and Shippable should start running CI for them. We don’t have much to test just yet, but we’ll add more code and test tools in coming articles.
GIT strategy and Setup
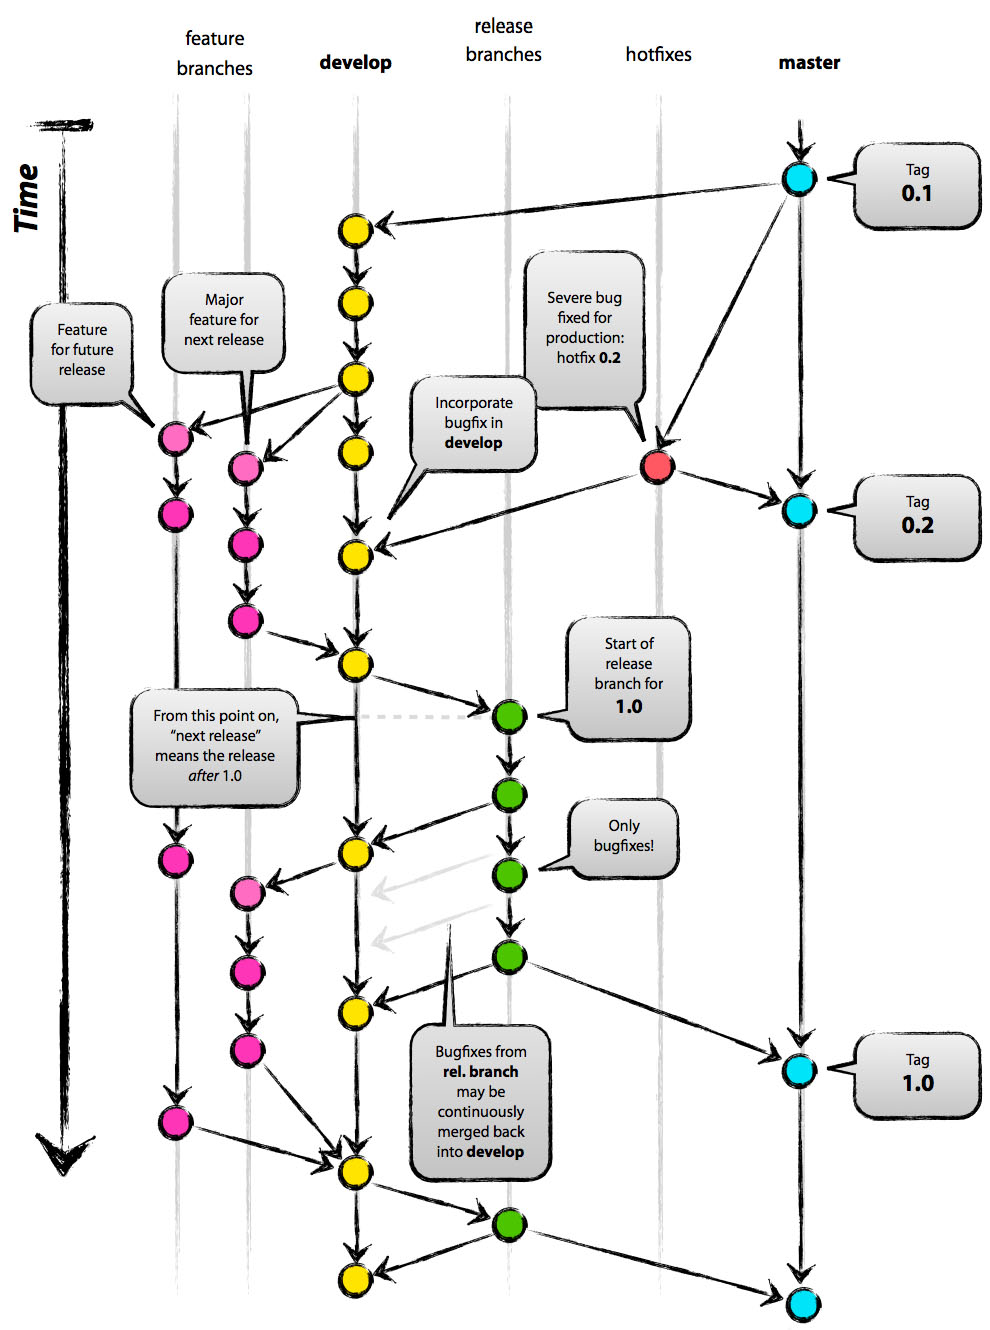
There are various strategies and processes for managing branching and merging in GIT repositories. I’m not going very deep into the subject here, but something along the line of Git Flow, GitHub Flow or GitLab Flow are the most common ones based on my experiences.


In the article setup we’re going to keep things simple and configure a light weight workflow resembling the GitHub Flow with a few key principles in mind:
- One constant branch: master
- Content that is merged to master is meant to be released immediately or very soon
- Direct pushes into master are forbidden, only merges via pull-requests are allowed
- Merges to master are possible only after successful CI builds
- Master is automatically tested when a merge operation is triggered
In coming articles we may complement the workflow with acceptance testing and production environment related details.
Enforcing Workflow Rules
It’s very straightforward to configure simple workflow rules in GitLab. The following settings are set for Front, App and Auth Service repositories via Settings:
General tab:
- Activate merge request approvals is checked; the details like approvers and required approval count can be set to meet different needs
- Only allow merge requests to be merged if the pipeline succeeds is checked
Repository tab:
- Master branch is set to be protected, merge permissions are given to Developers + Masters and push permissions to No one
Trial Run
The CI should now be in place so it’s time to see if the system is working as expected. Let’s create a new feature branch for the Front Service repository and change the Howdy there! text a bit:
|
5 6 7 |
export default () => ( <h1>Hi there!</h1> ); |
Then we’ll commit the change and make a pull-request to the master in GitLab. At this point we see that Shippable CI is triggered to make sure the proposed PR won’t break the tests. We don’t have any tests in place yet, so the CI job should run through successfully.
Once the pull-request related CI job is ready, we’ll merge the PR into the master. This will trigger another CI run which should also pass, push the Docker image into Docker Hub and update the testing environment.
Once the CI job is finished we’ll check the Hi there! text is also visible via the browser.

Summary
We’ve now setup a testing environment together with the CI integration. We’ve also set some Git rules to guide us in the upcoming development endeavours. There are still quite a few things to be done until we’re ready to deploy the services into the production environment, but step by step we’re getting there.
In the next Testing Environment (2/2) article we’ll take a closer look into component and system level testing and do some test planning.
References
Git
- Git branching model by Vincent Driessen: http://nvie.com/posts/a-successful-git-branching-model/
- GitHub Flow: https://guides.github.com/introduction/flow/index.html
- GitLab Flow: https://docs.gitlab.com/ee/workflow/gitlab_flow.html
- GitLab Flow guidelines: https://about.gitlab.com/2016/07/27/the-11-rules-of-gitlab-flow/
Kontena
- Kontena docs – stacks: http://www.kontena.io/docs/using-kontena/stacks.html
- Kontena docs – kontena.yml: http://www.kontena.io/docs/references/kontena-yml.html
- Kontena docs – kontena.yml variables: http://www.kontena.io/docs/references/kontena-yml-variables.html
 - https://juhakarna.fi/2017/05/14/modern-web-development-setup-the-testing-environment-12/)